Showing posts with label stampin up demonstrator. Show all posts

Tuesday, 19 July 2022

New 2022 Workshop: Hues of Happiness on the 4th of September


Hello everyone, I'm back!

I've joined Stampin' Up! again. I've been thinking about it for a while and when I saw this summer's Sale-A-Bration joining offer I couldn't resist any longer. On top of a great deal (£130 of product for just £99 incl. shipping and a Business Starter Set) you now also get the Making Plans Planner Kit, 3 Notebooks and Stamp Set for free. And who doesn't love a cute planner? I know I do.


So as soon as it came in, I started planning my first workshop: Sunday September 4th from 10.00 - 12.30 we'll be creating 2 cards and a decorated frame with the Hues of Happiness Suite. This suite is just the perfect, happy, all-rounder with foliage and blooms in bright rainbow colours. There's a versatile stamp set with matching dies as well as beautiful 12 x 12 patterned papers. I ordered this collection in my Starter Kit and it is stunning!

I've found a new location to hold my events, it's one of my favourite places in Portishead: Shanicatti Shakes. They look like a quirky English tearoom with porcelain tea cups and tea pots with cosies. They do amazing cakes and of course...shakes:-) I'm so chuffed that they were up for me holding events at their tearoom.

Send me an email at sgortzak@yahoo.co.uk if you'd like to join us. Costs are £ 20 incl. materials and drinks. You are encouraged to bring your own craft tools but don't worry if you haven't got any, there will be tools to use. All abilities are welcome: beginner, enthusiast and paper addicts, I've got you covered:-)

If you'd like to order the whole product suite before the workshop than the workshop is FREE for you. If you buy it after the workshop you'll get a credit towards another workshop. 

Hope to see you there!

Sonja

Tuesday, 4 June 2019

Come Stamp With Me: Colourful Cards Workshop in Portishead

It is with a lot of excitement and some trepidation that I'm sharing with you that I have booked my first workshop in the UK:


Sunday June 16th
Avon Way Hall in Portishead, North Somerset. Just south of Bristol.

It's a Papercrafting Workshop where we will be making 2 cards and 1 decorated notebook in a relaxed and fun atmosphere. Open to new and experienced crafters. We will be using a range of stamping and colouring techniques.

All materials for making the projects are included.

Coffee, tea and water will be provided.

We will start at 10.30 and finish at 12.45

Costs £12.50 incl. materials and drinks.

Plenty of parking space available and an access ramp.

Sign up by sending an email to sgortzak@yahoo.co.uk

Thursday, 14 February 2019

Blog Hop Stamp Fans


Happy Valentines Stamp Fans!

Today I have something special for you: I am taking part in a Blog Hop organised by one of my Stampin' Up! teamies in The Netherlands. So if you're looking for some more inspiration then follow the arrows at the bottom to check out all the other projects in the hop.

Our theme is red/pink to link in with Valentines day but it doesn't have to be a Valentines Card. I did, however, make a Valentines card for my son using Real Red, Melon Mambo and a little bit of Bermuda Bay to match the pink up with the red.

I started by stamping the stripey background in all 3 colours using the Incredible Like You stamp set. I adhered this to the background and punched three circles out of a piece of Whisper White Card Stock slightly smaller than the card base. I Attached this over the stripes using Stampin Dimensionals to create some height.

Next I stamped the Image of the woman hugging the child, from the Artfully Aware set, on some watercolour paper and colouored in using my water brush and some ink. While that dried I punched out a few circles from coloured cardstock and heat embossed the sentiment (from the Well Said stamp set) on some Real Red cardstock using White Embossing Powder.

Finally I adhered all the circles and the sentiment with lots of dimensionals again:-)

And inside I stamped "Love you more than all the Stars" from the Little Twinkle stamp set:

Ready for more? Follow the arrows:


Tuesday, 12 February 2019

Amazing Life Masculine Valentines Card


So my hubby appreciates a handmade card but not a pink one with lots of hearts and frills:-) Which is good because I realised last night that I don't really have much in the way of hearts m in my stash. So I went through my stamp sets to look for a suitable alternative: something genuine but not too mushy if you know what I mean:-)

I came across the Amazing Life stamp set that has this hand lettered feel to to it and found the perfect sentiment. I heat embossed it in white on some Wood Textures DSP and adhered all that to a white card base. It looked pretty good but it was missing something....

So back in my stash I dove to look for a die that might provide a little pop of colour. And I found it in the Everyday Jars Thinlits Dies. That set has this a little strip of itsy bitsy HEARTS! And that was exactly what this card needed: a tiny little red heart:-)

Happy Valentine's Day lovely people!

Saturday, 22 October 2016

Thankful Thoughts for the Colouring Challenge

Hi everyone!

My entry for the Pinkies Colouring Challenge is open for voting together with lots of other beautiful colouring techniques. Please visit Michelle's blog to vote for your Top 3 by clicking the heart in the Top right corner.

http://www.michellelast.co.uk/2016/10/pinkies-colouring-challenge.html

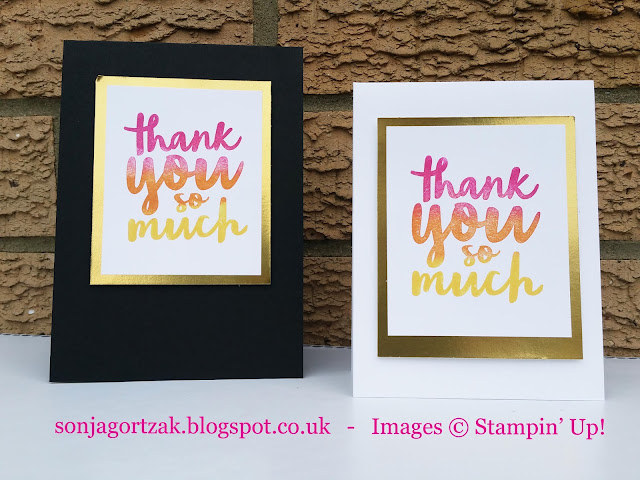
I thought I'd share these Thank You cards with you:
Colour in your stamps using sponge daubers and dye ink.

I made them for our Pinkies Team Challenge over at Michelle Last's blog. The theme of the challenge was:

COLOURING

One of the ways I like to colour in my stamps is by using sponge daubers:


For these cards I picked three colours that blend nicely: Daffodil Delight, Pumpkin Pie and Melon Mambo. I then applied them (lightest tot darkest colour) to the Thank You So Much stamp from the Thankful Thoughts set:

Then you "breath" on them to moisten them a bit and stamp! Mat onto Gold Foil Sheet and adhere to your card base with some dimensionals. That's it. Fun and simple! I hope you have a go yourself.

All products used for this project can be found in my shop. Just click on the 'Shop Now' Banner at the top.

Alternatively you can also e-mail me your order at sgortzak@yahoo.co.uk

My offer to refund you your P&P for orders placed over € 60/£50 with me is valid until Dec. 31st 2016. After you have placed and paid for your order just send me an e-mail: sgortzak@yahoo.co.uk

I can sell to any European country where Stampin' Up! is active: United Kingdom, The Netherlands, France, Germany and Austria. If you are in the USA, Canada, Japan, Australia or New Zealand you can contact a local demonstrator and they will be happy to help you.

Tuesday, 18 October 2016

Vintage Leaves - Like leaves on a tree the ideas are plentiful

One of the great things about being a Stampin' Up! demonstrator is that as soon as you join you become part of a great group of crafty ladies (and some gents even!). And they all love crafting just as much as you. And they are always up for sharing their knowledge with you. So when I moved to Portishead from Amsterdam one of the first things I did was to see what demonstrators there were in the Bristol area and get to know them. One of these lovely ladies, Jan from Plentiful Crafting,  has been so good about letting me join all of her Coffee 'n Card sessions so I got to meet some more crafty peeps in the area and I got to learn some new things.

Last Saturday I went to a full day card making workshop at The Home Crafters in Yate Shopping Center. This wonderful crafty place is full of hand made items from an array of crafts men and women. We were there to make Autumn Cards. And Jan had prepared 6 different cards for us to make and they were all different and all stunning so I thought I would share them with you here so you too could be inspired to make a whole stack of Autumn cards:

Stampin Up Vintage Leaves Stamps

This first one is simple elegance and I love the colours we used. We stamped the Vintage Leaves stamps in Delightful Dijon, Bermuda Bay and Tangerine Tango on some Very Vanilla cardstock and matted that onto an Early Espresso card base. Finishing it off with a small sentiment and some enamel shapes.


This colurful beauty used one of the Stampin' Up!'s eldest still available stamp set: Lovely as a Tree. We stamped just oak leave in several different colours on some Very Vanilla cardstock. Matting that on a piece of Garden Green cardstock which is then mounted on a Delightful Dijon base. Finishing it off with a sentiment on an oval die cut from the Layering Ovals Framelits. Colours used here were Garden Green, Delightful Dijon, Sweet Sugarplum and Tangerine Tango.


Thirdly we made a card using the Woodland Textured Impressions Embossing Folder. Doing a bit of sponging in Crumb Cake to bring out the tree trunks. Then stamping some small leaves from Lovely as a Tree and decorating with some wood veneer pieces. I have not added a sentiment yet. Not sure whom I will send this to.


Now this just looks so very chic! And it really only uses two colours: Crumb Cake and Delightful Dijon. We started by stamping the Vintage Leaves in Crumb Cake onto the middle Crumb Cake panel and also stamping one leave in Crumb Cake and one in Delightful Dijon to then run through a die cutting machine using the Leaflets Framelits. Adhered the Crumb Cake panel to a piece of Delightful Dijon and tied some lace and some ribbon across the front of them. We stamped a sentiment on some Very Vanilla and adhered it to the right half of the front panel making sure you could still see a little bit of the Crumb Cake panel peeking out. And then adhered the die cut leaves and added a bow on top. Full diclosure: that piece of ribbon was tied into a knot and then put onto the leaves, we tried tying it around the stems but that just doesn't look so good:-)


And just when I thought it couldn't get any better we were making this card! Don't you just love the vibrant colours set off against the dark background? I do! So to make this yourself you first stamp the Hardwood background stamp onto some Crumb Cake cardstock using Tip Top Taupe ink. You then sponge the edges with Crumb Cake. You then stamp the Vintage Leaves on Rose Red, Daffodil Delight and Old Olive Card stock and cut them out the Leaflets Framelits dies. Stamp a sentiment on top of the Hardwood background in Chocolat Chip ink and attach the leaves down the side.


So Jan totally saved the best for last. This wood panel card is just stunning! It takes a bit of time to make but I reckon it's worth it. You start by embossing a piece of Crumb Cake cardstock with the Brick Wall Embossing Folder. You then take a sponge dauber and sponge some Early Espresso Ink onto some of the vertical seams between the bricks. You then get out your Aquapainter and some Sahara Sand Ink and start covering your entire piece of cardstock with a watery layer of Sahara Ink. This then needs to fully dry. So in the mean time you can stamp and die cut your Vintage Leaves and sentiment. When your background is dry you stamp the Hardwood Background stamp onto it using Early Espresso Ink. Then adhere the leaves and sentiment using some dimensionals. 

So how about that for a great day of crafting? If you'd like to do this some time please go to Jan's Facebook page: Plentiful Crafting and check out all here events. I know there is another full day of Christmas Card making at The Home Crafters scheduled for next month. And there will be a Coffee and Card at the Chief Trading Post in Bristol this coming Wednesday. I love going there as well.

Main products used:

Hardwood Background Stamp

Vintage Leaves Stamp Set
Leaflets Framelits Dies


Lovely as a Tree


My offer to refund you your P&P for orders placed over € 60/£50 with me is valid until Dec. 31st 2016. After you have placed and paid for your order just send me an e-mail: sgortzak@yahoo.co.uk

Alternatively you can also e-mail me your order at sgortzak@yahoo.co.uk

You can find all supplies and more in my Stampin' Up! webshop, just click on the 'Shop Now' Banner at the top.


I can sell to any European country where Stampin' Up! is active: United Kingdom, The Netherlands, France, Germany and Austria. If you are in the USA, Canada, Japan, Australia or New Zealand you can contact a local demonstrator and they will be happy to help you.