Saturday, 22 October 2016

Thankful Thoughts for the Colouring Challenge

Hi everyone!

My entry for the Pinkies Colouring Challenge is open for voting together with lots of other beautiful colouring techniques. Please visit Michelle's blog to vote for your Top 3 by clicking the heart in the Top right corner.

http://www.michellelast.co.uk/2016/10/pinkies-colouring-challenge.html

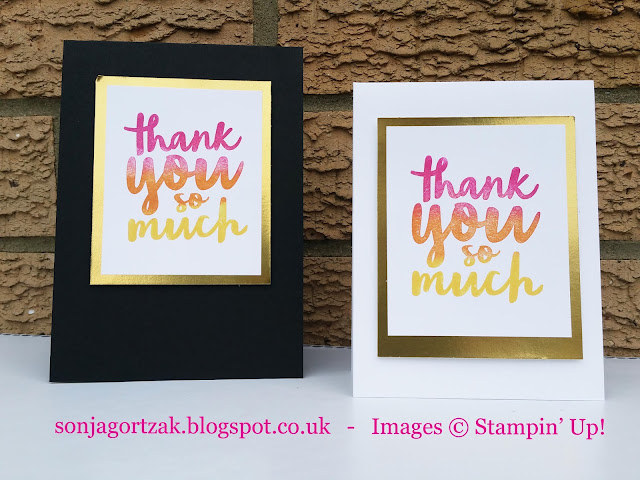
I thought I'd share these Thank You cards with you:
Colour in your stamps using sponge daubers and dye ink.

I made them for our Pinkies Team Challenge over at Michelle Last's blog. The theme of the challenge was:

COLOURING

One of the ways I like to colour in my stamps is by using sponge daubers:


For these cards I picked three colours that blend nicely: Daffodil Delight, Pumpkin Pie and Melon Mambo. I then applied them (lightest tot darkest colour) to the Thank You So Much stamp from the Thankful Thoughts set:

Then you "breath" on them to moisten them a bit and stamp! Mat onto Gold Foil Sheet and adhere to your card base with some dimensionals. That's it. Fun and simple! I hope you have a go yourself.

All products used for this project can be found in my shop. Just click on the 'Shop Now' Banner at the top.

Alternatively you can also e-mail me your order at sgortzak@yahoo.co.uk

My offer to refund you your P&P for orders placed over € 60/£50 with me is valid until Dec. 31st 2016. After you have placed and paid for your order just send me an e-mail: sgortzak@yahoo.co.uk

I can sell to any European country where Stampin' Up! is active: United Kingdom, The Netherlands, France, Germany and Austria. If you are in the USA, Canada, Japan, Australia or New Zealand you can contact a local demonstrator and they will be happy to help you.

Tuesday, 18 October 2016

Vintage Leaves - Like leaves on a tree the ideas are plentiful

One of the great things about being a Stampin' Up! demonstrator is that as soon as you join you become part of a great group of crafty ladies (and some gents even!). And they all love crafting just as much as you. And they are always up for sharing their knowledge with you. So when I moved to Portishead from Amsterdam one of the first things I did was to see what demonstrators there were in the Bristol area and get to know them. One of these lovely ladies, Jan from Plentiful Crafting,  has been so good about letting me join all of her Coffee 'n Card sessions so I got to meet some more crafty peeps in the area and I got to learn some new things.

Last Saturday I went to a full day card making workshop at The Home Crafters in Yate Shopping Center. This wonderful crafty place is full of hand made items from an array of crafts men and women. We were there to make Autumn Cards. And Jan had prepared 6 different cards for us to make and they were all different and all stunning so I thought I would share them with you here so you too could be inspired to make a whole stack of Autumn cards:

Stampin Up Vintage Leaves Stamps

This first one is simple elegance and I love the colours we used. We stamped the Vintage Leaves stamps in Delightful Dijon, Bermuda Bay and Tangerine Tango on some Very Vanilla cardstock and matted that onto an Early Espresso card base. Finishing it off with a small sentiment and some enamel shapes.


This colurful beauty used one of the Stampin' Up!'s eldest still available stamp set: Lovely as a Tree. We stamped just oak leave in several different colours on some Very Vanilla cardstock. Matting that on a piece of Garden Green cardstock which is then mounted on a Delightful Dijon base. Finishing it off with a sentiment on an oval die cut from the Layering Ovals Framelits. Colours used here were Garden Green, Delightful Dijon, Sweet Sugarplum and Tangerine Tango.


Thirdly we made a card using the Woodland Textured Impressions Embossing Folder. Doing a bit of sponging in Crumb Cake to bring out the tree trunks. Then stamping some small leaves from Lovely as a Tree and decorating with some wood veneer pieces. I have not added a sentiment yet. Not sure whom I will send this to.


Now this just looks so very chic! And it really only uses two colours: Crumb Cake and Delightful Dijon. We started by stamping the Vintage Leaves in Crumb Cake onto the middle Crumb Cake panel and also stamping one leave in Crumb Cake and one in Delightful Dijon to then run through a die cutting machine using the Leaflets Framelits. Adhered the Crumb Cake panel to a piece of Delightful Dijon and tied some lace and some ribbon across the front of them. We stamped a sentiment on some Very Vanilla and adhered it to the right half of the front panel making sure you could still see a little bit of the Crumb Cake panel peeking out. And then adhered the die cut leaves and added a bow on top. Full diclosure: that piece of ribbon was tied into a knot and then put onto the leaves, we tried tying it around the stems but that just doesn't look so good:-)


And just when I thought it couldn't get any better we were making this card! Don't you just love the vibrant colours set off against the dark background? I do! So to make this yourself you first stamp the Hardwood background stamp onto some Crumb Cake cardstock using Tip Top Taupe ink. You then sponge the edges with Crumb Cake. You then stamp the Vintage Leaves on Rose Red, Daffodil Delight and Old Olive Card stock and cut them out the Leaflets Framelits dies. Stamp a sentiment on top of the Hardwood background in Chocolat Chip ink and attach the leaves down the side.


So Jan totally saved the best for last. This wood panel card is just stunning! It takes a bit of time to make but I reckon it's worth it. You start by embossing a piece of Crumb Cake cardstock with the Brick Wall Embossing Folder. You then take a sponge dauber and sponge some Early Espresso Ink onto some of the vertical seams between the bricks. You then get out your Aquapainter and some Sahara Sand Ink and start covering your entire piece of cardstock with a watery layer of Sahara Ink. This then needs to fully dry. So in the mean time you can stamp and die cut your Vintage Leaves and sentiment. When your background is dry you stamp the Hardwood Background stamp onto it using Early Espresso Ink. Then adhere the leaves and sentiment using some dimensionals. 

So how about that for a great day of crafting? If you'd like to do this some time please go to Jan's Facebook page: Plentiful Crafting and check out all here events. I know there is another full day of Christmas Card making at The Home Crafters scheduled for next month. And there will be a Coffee and Card at the Chief Trading Post in Bristol this coming Wednesday. I love going there as well.

Main products used:

Hardwood Background Stamp

Vintage Leaves Stamp Set
Leaflets Framelits Dies


Lovely as a Tree


My offer to refund you your P&P for orders placed over € 60/£50 with me is valid until Dec. 31st 2016. After you have placed and paid for your order just send me an e-mail: sgortzak@yahoo.co.uk

Alternatively you can also e-mail me your order at sgortzak@yahoo.co.uk

You can find all supplies and more in my Stampin' Up! webshop, just click on the 'Shop Now' Banner at the top.


I can sell to any European country where Stampin' Up! is active: United Kingdom, The Netherlands, France, Germany and Austria. If you are in the USA, Canada, Japan, Australia or New Zealand you can contact a local demonstrator and they will be happy to help you.


Wednesday, 12 October 2016

Getting sidetracked by a scarecrow - Cookie Cutter Halloween Stamp set and Punch

Halloween Cookie Cutter Stamp set and Punch

So last week I decided to get cracking on Halloween Treats. I had checked with one of the neighbours and YES they do Halloween here. I then checked how many kids would come by... 50! So let's not leave this till the last minute and break out my new Cookie Cutter Halloween Stamp set and the matching Cookie Cutter Punch:


 This set has 4 cute gingerbread shaped "characters": A skeleton, a mummy, Dracula jr and....a scarecrow. And it is this scarecrown that got me totally side tracked. I just had to colour him in and then I just had to make some cards with him:-)

I used my Stampin' Write Markers to colour him in. These are dual tipped markers in the same colours as the Stampin' Up! dye inks and match the cardstock perfectly. I did a version on Whisper White (below) and one on Crumb Cake cardstock. I like both but I think the Crumb Cake background gives it just that little bit more of "scarecrow" feel if I imagine that they are made from old burlap bags:-)

Stampin Up Cookie Cutter Halloween Birthday Card

And now I still have to make those Halloween treats:-) Wish me luck...and focus:-)

Anybody else doing handmade Halloween Treats? Let me know what you're doing. I'd love to hear.

xxx

Sonja


Wednesday, 5 October 2016

Vintage Leaves and Serene Scenery Paper Stack - Match Made in Heaven?

You may remember that I was determined to use up my Serene Scenery Paper Stack (see this blogpost from August) and I am happy to report I have found another good match! Last week after I had been making my Hardwood Maple Leave card. I had die cut quite a few different leaves and had stamped them as well but didn't use them for that project so they were lying on my craft desk when I said down to make some Project Life cards with the Serene Scenery Paper Stack. Only I never got around to Project Life because I realized I could do something fab if I combined one of the papers from the Serene Scenery Paper Stack with my die cut Vintage Leaves:

Vintage Leaves and Serene Sceneries Patterned Paper


Love how this turned out. The multi-coloured leaves were made by sponging different colours of ink onto my Vintage Leaves stamps using sponge daubers. I love how daubers give a light layer of colour and you get a  gradual blend of colours. I made sure to start with the lighter colours first and green last so I wouldn't get any dark Garden Green in my Delightful Dijon:-)


Vintage Leaves - Leaves Framelits Dies - Serene Scenery Paper Stack

Supplies used:


You can find all supplies and more in my Stampin' Up! webshop: http://tinyurl.com/shopsonjagortzak

My offer to refund you your P&P for orders placed over € 60/£50 with me is valid until Dec. 31st 2016. After you have placed and paid for your order just send me an e-mail: sgortzak@yahoo.co.uk

Alternatively you can also e-mail me your order at sgortzak@yahoo.co.uk

I can sell to any European country where Stampin' Up! is active: United Kingdom, The Netherlands, France, Germany and Austria. If you are in the USA, Canada, Japan, Australia or New Zealand you can contact a local demonstrator and they will be happy to help you.


Saturday, 1 October 2016

Stampin' Up! Designer Series Paper Sale this entire October

So what a start to the Month! First we have the 5-day World Card Making Day Offers and then we also have this great Designer Series Paper Sale for the entire month of October:


So you can pick four of these eight packs of gorgeous Designer Series Paper for the price of three is a great bargain! And you can order 4 of the same and get enough patterned paper for all your Christmas cards. But maybe you'd rather get different ones. It's up to you. And....you can also double or triple up. There is no limit to how many you order.

And you may want to share your paper packs with a crafty friend so you can get an even better deal. It's all up to you.

And be sure to combine this offer with the World Card Making Day offers so you safe on P&P. Should your order with me reach £ 50/€ 60 then I will refund your shipping costs*. So you get an even better deal. Irrisistable really:-) So head on over to the webshop and get yourself some crafty deals. 

Much love,

Sonja


*I can sell to any European country where Stampin' Up! is active: United Kingdom, The Netherlands, France, Germany and Austria. If you are in the USA, Canada, Japan, Australia or New Zealand you can contact a local demonstrator and they will be happy to help you.


Friday, 30 September 2016

Stampin' Up! 5-day offer in celebration of World Card Making Day

Hello everyone!

I have some exciting news to share with you today. Stampin' Up! has a great 5-day Stock Up sale in honour of World Card Making this Saturday. So from October 1-5 you get 15-25% discount on these 7 products:


These are really great offers and did you see the Designer Tin of Cards is on offer for 25% off? I can hardly believe it. The Designer Tin of Cards Kit is a cute blue and white striped tin with all the paper supplies and embellishments to make 16 cards: 4 each of 4 different designs. The tin is meant to keep your cards in. It has tabs to divide different sections: Birthday, Thank You, Just Because, Get Well Soon etc. And it would make a great (Christmas) gift.


In order to complete the cards it is recommended you use Crushed Curry, Cucumber Crush, Dapper Denim, Emerald Envy, and Tip Top Taupe Classic Stampin’ Pads; Fast Fuse Adhesive; Mini Glue Dots; and Stampin’ Dimensionals ánd the Designer Tin of Cars Stamp Set:


Now I was thinking of doing another video for you about this kit but then I realized Brandi from Stampin' Up! head office had already done a really great video so here's a link to that video so you can have a look at what's in the kit and how to make what's inside (click on the little square in the bottom right hand corner to see it full screen):


You can order this kit and the other great deals from Saturday 1st of October until the 5th of October 2016. But.......

There will also be another great offer starting on the 1st of October and that will be a Designer Series Paper sale so be sure to check back here tomorrow when I tell you all about that. I want you to take full advantage of these offers and combine them all on one order so you safe on shipping. And remember, until the end of 2016, am refunding your shipping if you order over £ 50 / € 60. 

Don't want to wait? You can find all offers and more in my Stampin' Up! webshop


Have a great weekend!

xoxo

Sonja


Tuesday, 27 September 2016

Stampin' Up! Leaves Framelits Autumnal Window Birthday Card

Hello Autumn!

My favourite season of the year. And I have a simple and chic card for you using one of the Leaves Framelits dies and the Hardwood background stamp:

Hardwood Background Stamp and Leaves Framelits

To re-create this card you start by making the background: Sponge Delightful Dijon, Pumpkin Pie and Rose Red inks onto a Thick Whisper White cardstock base. (I use a wedge of the Stampin Sponges.) You then stamp the Hardwood background stamp over the background in Cherry Cobbler. You then take a piece of Very Vanilla cardstock just a little bit shorter (5 mm) than your card base and die cut the maple leave from the Leaves Framelits die set. Make sure you center your die cut and cut it from the top 3/4 of your card stock. Then stamp your sentiment at the bottom in Cherry Cobbler. Seperate the sentiment from the die cut and adhere to the background using lots of dimensionals:-) Be sure to leave a little gap between top and bottom for the background to peep through.

The sentiment came from the Wetlands stamp set. I really love the font, don't you?

I have entered this card into Take it, Make it Challenge at one of my fave craft Magazines: Craft Stamper. Always so full of good stuff!


Supplies used:


You can find all supplies and more in my Stampin' Up! webshop: http://tinyurl.com/shopsonjagortzak

My offer to refund you your P&P for orders placed with me for over € 60/£50 is valid until Dec. 31st 2016. After you have placed and paid for your order just send me an e-mail: sgortzak@yahoo.co.uk

Alternatively you can also e-mail me your order at sgortzak@yahoo.co.uk

I can sell to any European country where Stampin' Up! is active: United Kingdom, The Netherlands, France, Germany and Austria. If you are in the USA, Canada, Japan, Australia or New Zealand you can contact a local demonstrator and they will be happy to help you.


Thursday, 22 September 2016

Stampin' Up! Thoughtful Branches - such a lovely set

For the last two weeks I have been crafting with the Thoughtful Branches set. This is a limited edition set that came out in August and it is such a lovely and versatile set. There is a stamp set and a die set which are available as a bundle:


Now the stamp set is lovely and you can do some beautiful things with it:


But this set really comes into its own when you start combining it with the dies. The intricate dies work together so well:


And the stamps allow you to really build a scene and using colour to give it a seasonal feel:

Summer:


Autumn


And then you can use the dies in a completely different direction:


Cute or what? I love it!

Now this set is available until stock runs out. To order it just go to my webshop or send me an e-mail: sgortzak@yahoo.co.uk

The order number for the bundle is 144328 and gives you 15% discount on the total price. For just the stamp set choose order nr. 143539. There are also versions in French and German available.

My offer to refund you your P&P for orders placed over € 60/£50 with me is valid until Dec. 31st 2016. After you have placed and paid for your order just send me an e-mail: sgortzak@yahoo.co.uk

I can sell to any European country where Stampin' Up! is active: United Kingdom, The Netherlands, France, Germany and Austria. If you are in the USA, Canada, Japan, Australia or New Zealand you can contact a local demonstrator and they will be happy to help you.

Saturday, 17 September 2016

Video: Stampin' Up! Oh Happy Day Card Kit

This week I did something I have never done before: I made a video. It was so much fun! The editing and uploading was less fun but I am sure that will get easier as I do it more often...yes I am planning on doing it more often.

The video is all about the Oh Happy Day Card Kit, an all-inclusive kit to make 20 cards. In the kit you will find card bases, envelopes, cardstock and hardboard die cuts, embellishments, baker's twine as well as ink, a clear block, dimensionals aaaaaand a stamp set! There are also instructions included and it all comes in a pretty craft box that you can probably make something else cool out of.

So without further ado here's the video:


Want to order this kit? It would make a great birthday or christmas present:-) You can do so by visiting my webshop or sending me an e-mail: sgortzak@yahoo.co.uk

The order nr. 142725. There are also versions in French and German available. It's everything you need to make 20 cards, including a stamp set, ink and a clear block.

My offer to refund you your P&P for orders placed over € 60/£50 with me is valid until Dec. 31st 2016. After you have placed and paid for your order just send me an e-mail: sgortzak@yahoo.co.uk

I can sell to any European country where Stampin' Up! is active: United Kingdom, The Netherlands, France, Germany and Austria. If you are in the USA, Canada, Japan, Australia or New Zealand you can contact a local demonstrator and they will be happy to help you.

To find out more about Sara Douglass' Facebook live event on September 20th you can go to her Facebook page: www.facebook.com/asarathing

Thursday, 1 September 2016

First play with Holly Berry Happiness from the 2016 Autumn-Winter Catalogue by Stampin' Up!

Hi guys,

Today the new Stampin' Up! Autumn-Winter catalogue was launched and it is full of crafty goodness again: Autumn, Halloween, Thanksgiving, New Year's and of course.....Christmas!

As a demonstrator I got to order my goodies last month already (with a nice discount as well) and had a play with them last weekend:


I used Pear Pizzazz (green) and Cherry Cobbler (ruby red) cardstock and ink. And that cute thin ribbon on the background is the Gold 1/4" (6.4 Mm) Natural Trim.

Ready to have a look at the catalogue yourself? Click on the picture below to be taken to the pdf version:


Want the real thing? Send me an e-mail with your address and I'll mail it to you or drop it off (if you're anywhere near Portishead:-). I only charge the postage for this but I'll refund you that on your first order.

Another exciting thing happening right now is the discounted annual catalogue products in Stampin’ Up!’s Special Offers. I know I’ll be ordering a few of the discounted products—they’re such a great deal! Click on the image below to see this week’s Special Offers and see what items you can save on:

And remember, if you order at least £ 50/ € 60 of product I will refund you your P&P. I can take orders from the UK, Holland, Germany, France and Austria. You can read everything about ordering with me on my Ordering Stampin' Up! page.

Happy Shopping!


Monday, 29 August 2016

Serene Scenery Paper Stack - oh the possibilities!


If you've been following me on Instagram you may know that I am trying to use up the supplies I get in. It is so easy hoarding all your pretty paper and embellishments but that is not really why I bought them. I bought them to make pretty things with that put a smile on the face of the people I send them too. Cause really that is why I make and send cards: spread the love one card (or letter:-) at a time.

And so when I got the really cool Serene Scenery Paper Stack, with 48 papers in 12 different designs I was determined to use them up:


I particularly liked the photo-realistic ones and was lucky to find this video by the talented Patty Bennett to help me make my first dent into the stack. She made about 50 cards, now that is some serious using-it-up! I was inspired to make couple myself:


Not too bad but I think I love my latest pairing most: 


For the card on the left I fussy cut the stamped images of From Land to Sea and arranged them on top of the weather wood paper from the Serene Scenery paper stack and I love how it turned out. On top of that I used the Banner and sentiment from Badges and Banners. This card went to a fellow demonstrator. I decided to swap half of my paper stack with  her so I wrapped it up nicely with a shield from the Banners and Badges set.

What do yo think? What else could I make with this? I was thinking some Project Life cards for sure.

Friday, 5 August 2016

We have landed in Portishead: a little introduction


Well hello People, so nice to meet you. My name is Sonja Gortzak and June 2016 I arrived in Portishead, North Somerset with my English husband and our 7 year old son. It has been sad to leave all my friends and family and our beautiful (spacious!) Amsterdam appartement behind but I am ready for a new adventure. And North Somerset is a pretty good place to go to. It is so beautiful, I feel blessed to have moved here. I mean just look at that view:


So after the initial unpacking of many many boxes (and putting the rest, about half, of them) in our garage I finally had some time to make a creative space. That was such a good day. So much tension was relieved the night I said down at that big white desk and made a Project Life layout again for the first time in ages....


Now that I have a desk again and all my supplies at my fingertips I have been in a creating boom. It is too much to create blog posts for but I post most of it on Instagram so be sure to follow me if you're on there as wel: sonja.gortzakhughes .  Some of the things I have been doing:

 I am really into sending snailmail: I love cutting up magazines and the likes and turning them into decorated letters to send to penpals:


I have finally started in my Heidi Swapp Memory Planner. I write a little bit into every day and I really enjoy it. I do some decoratinig with stickers and washi tape and add some stamping and colouring or a photo here and there. So enjoyable.


Our son is not a big crafter, he loves cyling, running, music and cars. So I try and get him involved in crafting by making stuff he can use with his cars:


And then of course there is Stampin' Up! I have been making some cards with the new Serene Sceneries Card Stack from the 2016-2017 catalogue. These were inspired by this video from Patty Bennet and are on their way to their recipients:


I have also used some retired embellishments and stamp sets on this one. One of my goals is to use up the supplies I bring in so I feel like I have made the most of the money I have invested (and there is always room for new stuff:-) So I will be working more in bulk I think and make some more projects with this versatile stack. Next project with these will likely be some Project Life cards. What would you make with these:


Well, have a lovely day and hope you enjoyed this post!

xx

Sonja